
Git for non-developers (and total newbies)
Update in 2023: A lot of things have changed since I originally wrote this! Most of it still holds true, but now there's GitHub Desktop which serves most of my content-updating needs. I highly recommend this tutorial video from Digital.gov about GitHub and GitHub Desktop.
If you’re just here for the quick references, get right to it!
If you are in any way associated with code, you will likely be tasked to learn Git sooner or later. After all, not all updates to code require a developer’s expertise. If you just need to go in and change some wording to a webpage, your developers will LOVE YOU if you can do it yourself.
After a few of my UX friends said, “I really should learn Git,” I decided writing this blog post would be the thing to do. One thing about free, open-source projects, is that documentation for non-technical people can be rather scarce!
So here is a crash course in Git, primarily for non-developers, just enough to make you useful around full-time developers. The following is about how much I need to know as a UX designer who helps out in front-end code at times. I leave the fancy stuff to the full-time devs, such as the details of how Git actually works. 🙂
What is Git and why do I need to learn it?
Git is the most popular version control system for a coded project. If there is more than one developer working on a project, you need some way to organize and merge the changes so you don’t accidentally overwrite each other’s stuff. Mysteriously disappearing code is probably the fastest way to piss off a dev!
If you’re working on a project on your own, it’s also a good idea to have version control in case one of your changes borks everything and you need to go back to an earlier version. It’s a good way to cover everyone’s asses, basically.
So…what is Git exactly?
Git is software on your computer that tracks changes (“snapshots”) you make to a project, and tracks any changes made to a project that’s on a server off of your computer (“remote”). The snapshots on either end are stored in a hidden folder called a “repository” (or “repo” for short) that’s always named .git in the project.
You can copy an existing Git project from a remote server to your computer (“clone”). You can then easily copy over any changes made in that remote project to your computer (“pull”), so you can have the latest version before you work on it. Then you can just as easily transfer your changes to the remote project (“push”) so everyone can see it.
You can make a copy of the code for your own use and do whatever you want to it, while not having a direct effect on the original project (“fork”).
A Git project may also have many “branches” if the project is complicated and has a lot of moving parts, but if that’s the case, you’ll be told which branch to work from.
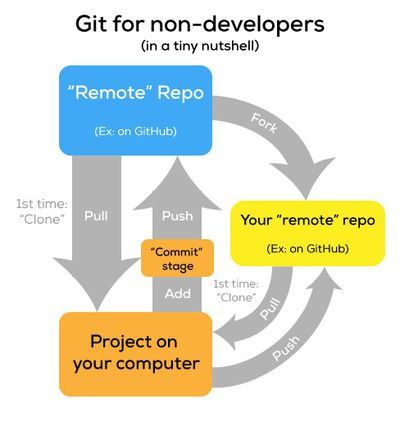
Because of how Git tracks changes, you’ll need to reserve a folder especially for the project you’re working on. Git will track ALL the changes made within the folder that contains the .git folder. Organization is KEY. A Git project folder should not be one where you save angry letters you never sent your ex, because those will be pushed to the remote project as well!
And what is GitHub?
GitHub is a place where developers can store their code publicly using Git. Great for open-source, and sometimes used as a CV for developers. (Someone who works on open source projects and shows it off is someone who loves to code!) Because of that, when you use Git, you’re usually using GitHub as well, but there are other project-hosting sites such as Bitbucket.
The important thing to note is that you’ll have a unique username with Git, so that everyone can track who changed what. It will be shared through all of your Git-related projects. Your Git username will be the one you use for GitHub, Bitbucket, etc.
How do I get started with Git?
First, download Git and install it like any other software. If you wish, make an account on GitHub and be sure to remember your credentials on it.
There is software for Git where you can select files and drag/drop things, but the fastest way to use Git is through the command line: Terminal (Mac) or Command Prompt (Windows). Type in some lines, press enter, and stuff happens in very rapid fashion! When you’re making constant changes (and if constant changes are happening), faster is better!
To use Git for the very first time, you’ll need to add your credentials. Type the following into your command line, pressing “Enter” after each line:
git config --global user.name "YOUR NAME"
git config --global user.email "YOUR EMAIL ADDRESS"
Remember, those have to be the same credentials you use on GitHub and any other project hosting site.
How do I use Git for projects?
If you are not a developer, 99% of the time you will be copying over an existing project to your computer to modify. This is called “cloning.”
Clone
Open up the your command line program, and switch over to the folder you want your project to go in. You do this by typing:
cd [folder path]
On a Mac you can simply drag over the folder from Finder to the Terminal, and it will populate the path name for you.
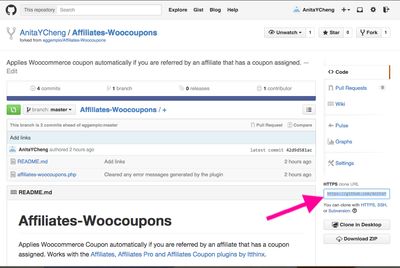
Next you have to copy the Git clone URL of the remote project (shortened in Git-speak to “remote”). In GitHub, it is here:
You clone the project by entering the following in your command line:
git clone [Git clone URL]
This will copy over all the files and folders from the remote to the folder you designated, which will show in the command line after you enter it. The name of the project folder will be the same as the name it has in the remote.
This also sets that URL with the remote name origin, which we will use later to push changes from our computer.
Pull
If you want to update your computer’s version of the project to the latest on the remote, enter:
git pull
This does two things: it updates all the changes made to your remote AND merges any changes with your project. Pretty cool!
But sometimes if you’re on the verge of pushing some big changes, you want to check for remote changes but not merge them into your project quite yet..
Fetch
If you want to check for updates but not merge right away, type in:
git fetch [remote name]
But pulling is okay for most uses, because it fetches and merges at the same time. If you’re working like me and doing front-end while another person does back-end, you don’t usually have to worry about merges that overwrite each other.
Updating the remote
Okay, you’ve made some changes to the code on your computer and you want to update the remote! Here are a few things to note:
- When you save your project to your computer, Git does not automatically track the change to the local repo.
- You have to “add” any new changes to a virtual staging area that Git has, to gather snapshots of the changes before “committing.”
- “Committing” basically says, “This is the set of changes I want to save in my Git history.” Committing will put things on the record, so to say. It’s a finalizing of the changes before you send them off.
- After you finalize the changes, you “push” them to the remote.
That was a bunch of tech-splaining in order to justify why we need 3 separate lines of code to update a remote. 😛
Make sure you’re in the right project folder path in your command line, then type the following, pressing “enter” each time after the system updates you:
git add .
git commit -m "[Write something informative about the changes you made here]"
git push
If you’re using GitHub, you’ll sometimes be asked for your credentials. That’s normal.
Usually just git push will do it if you’re in the right project folder and there’s only one “branch” on the remote, but if you want to get more specific, you can use:
git push origin master
origin is the name of the repo you cloned from – it’s set automatically when you cloned it originally. master is the name of the main branch. If the project is simple, it will only have one branch which is the master, so normally you won’t need to specify it. If you’re working in another branch, just replace master with the name of the branch.
If code is being overwritten with your changes, Git will tell you and you can change your own code before overwriting someone else’s stuff. Also a good reason why you should talk freely with your developers!
What it looks like for real….
Here’s what my Terminal looks like after cloning a repo (which was a fork I made from another project, on GitHub) and pushing changes to that remote after making changes.
Note that I only wanted to push changes from that one project, instead of everything from its parent (I have a general GitHub projects folder in my Dropbox). That’s why I changed folders between cloning and pushing. You may be doing something different, so remember to pay attention to which folder you’re working in, in your command line.
anitas-mbp:ParallaxFeaturedImage az$ cd /Users/az/Dropbox/GitHub
anitas-mbp:GitHub az$ git clone https://github.com/AnitaYCheng/Affiliates-Woocoupons.git
Cloning into 'Affiliates-Woocoupons'...
remote: Counting objects: 6, done.
remote: Compressing objects: 100% (5/5), done.
remote: Total 6 (delta 0), reused 6 (delta 0)
Unpacking objects: 100% (6/6), done.
Checking connectivity... done.
anitas-mbp:GitHub az$ cd /Users/az/Dropbox/GitHub/Affiliates-Woocoupons
anitas-mbp:Affiliates-Woocoupons az$ git add .
anitas-mbp:Affiliates-Woocoupons az$ git commit -m "Cleared any error messages generated by the plugin"
[master b632819] Cleared any error messages generated by the plugin
 2 files changed, 25 insertions(+), 10 deletions(-)
 rewrite README.md (70%)
anitas-mbp:Affiliates-Woocoupons az$ git push
Counting objects: 7, done.
Delta compression using up to 4 threads.
Compressing objects: 100% (4/4), done.
Writing objects: 100% (4/4), 1.06 KiB | 0 bytes/s, done.
Total 4 (delta 1), reused 0 (delta 0)
To https://github.com/AnitaYCheng/Affiliates-Woocoupons
   666b73c..b632819  master -> master
How can I keep track of what I did in Git?
If you’re working hard in the code, you may get up to get a snack and forget where you were in the Git process. Use:
git status
It’ll give you a status report of the Git repo you’re in.
Oh no, Git got messed up! What do I do?
Updated June 5, 2018. I should handle this with a scalpel and not a sledgehammer, haha...
If you already have a project on your computer and Git has messed up somehow, there are several ways to handle it.
The proper way of undoing things
If you want to change your commit message or add some more files (and gosh knows I’ve wanted to before…) try:
git commit --amend
If the changes are local and not committed or pushed, the following will work to undo it:
git reset --hard origin/[branch name]
There’s a lot more to it depending on what you want to do. Head on over to the Git documentation about Undoing Things!
The YOLO method, when things are completely borked and you just want to start over
I’ve tried the following a few times when just wanting to start over. It works for a completely clean slate, but use at your own risk!
Make hidden folders visible (should be in the options in Finder or Windows Explorer), find the .git folder in that project, then delete it. Right from Finder or Windows Explorer is fine!
Then initialize Git again for the project by switching to the project folder in your command line (cd \[folder name\]) and typing the following:
git init
If you do this, you’ll likely also have to set up the remote link for the project, so Git will know where to push changes to. Again, an easy fix:
git remote add origin [Git clone URL]
To check the clone URLs, you can review your remotes with:
git remote -v
The command line will then pop out a list of remote names and their URLs. If you need to change the URL of a remote:
git remote set-url [remote name] [Git clone URL]
Most of the time, your remote name will be origin but you can name it something else.
That’s Git for non-developers!
Most of what I was doing in Git was pulling/fetching, then pushing. It’s what you will likely be doing as well when helping out in code. There’s a lot of other neat things that Git can do, which includes logging differences, splitting commits, making branches, merging branches, etc etc. But again, this was a crash course and the extra stuff is something a full-time developer would do. 🙂